
| 일 | 월 | 화 | 수 | 목 | 금 | 토 |
|---|---|---|---|---|---|---|
| 1 | 2 | 3 | ||||
| 4 | 5 | 6 | 7 | 8 | 9 | 10 |
| 11 | 12 | 13 | 14 | 15 | 16 | 17 |
| 18 | 19 | 20 | 21 | 22 | 23 | 24 |
| 25 | 26 | 27 | 28 | 29 | 30 | 31 |
- 게임프로그래밍패턴
- 프로세스
- 언리얼엔진5
- BehaviorTree
- 언리얼엔진
- 포인터
- 프로그래밍
- 자료구조
- 게임 개발
- 복사생성자
- 게임개발
- UE5
- 언리얼
- 배열
- C++
- effectivec++
- CPP
- 언리얼5
- Unreal
- AI
- 디자인패턴
- 데이터구조
- 생성자
- Unreal Engine5
- cpp개발
- 소멸자
- C언어
- 복사대입연산자
- Unreal Engine
- 언리얼 엔진5
- Today
- Total
리얼 개발
[UE5] 아이템 획득하기 본문
특정 구역에 들어가면 캐릭터가 아이템을 획득할 수 있게 만들어보자.
우선 ItemBox 라는 클래스를 만들어 우리가 들어갔을 때 반응할 액터를 만들자.
public:
	// Sets default values for this actor's properties
	AItemBox();

protected:
	virtual void BeginPlay() override;

public:
	UPROPERTY(EditAnywhere, BlueprintReadWrite, Category = "Box")
	TObjectPtr<class UBoxComponent> Trigger;

	UPROPERTY(EditAnywhere, BlueprintReadWrite, Category = "Box")
	TObjectPtr<class UStaticMeshComponent> Mesh;

	UPROPERTY(EditAnywhere, BlueprintReadWrite, Category = "Box")
	TObjectPtr<class UItemData> Item;

	UFUNCTION()
	void OnOverlapBegin(UPrimitiveComponent* OverlappedComp, AActor* OtherActor,
    			UPrimitiveComponent* OtherComp, int32 OtherBodyIndex,
    			bool bFromSweep, const FHitResult& SweepResult);
#include "ItemBox.h"
#include "Components/StaticMeshComponent.h"
#include "Components/BoxComponent.h"
#include "CharacterItemInterface.h"
#include "ItemData.h"

// Sets default values
AItemBox::AItemBox()
{
    Trigger = CreateDefaultSubobject<UBoxComponent>(TEXT("Trigger"));
    Mesh = CreateDefaultSubobject<UStaticMeshComponent>(TEXT("Mesh"));

    RootComponent = Trigger;
    Mesh->SetupAttachment(Trigger);

    Trigger->SetBoxExtent(FVector(40.0f, 40.0f, 40.0f));
    Trigger->OnComponentBeginOverlap.AddDynamic(this, &AItemBox::OnOverlapBegin);
    Trigger->SetCollisionProfileName("Item");

    Mesh->SetCollisionProfileName("NoCollision");

    static ConstructorHelpers::FObjectFinder<UStaticMesh> MeshRef(TEXT("/Script/Engine.StaticMesh'/Game/LevelPrototyping/Meshes/SM_Cube.SM_Cube'"));
    if (MeshRef.Object)
    {
        Mesh->SetStaticMesh(MeshRef.Object);
    }
}

void AItemBox::BeginPlay()
{
    Super::BeginPlay();

		//구역 박스를 표시할 디버그
    DrawDebugBox(GetWorld (), GetActorLocation(), FVector(40.0f, 40.0f, 40.0f), FColor::Red, true);
}

void AItemBox::OnOverlapBegin(UPrimitiveComponent* OverlappedComp, AActor* OtherActor, UPrimitiveComponent* OtherComp, int32 OtherBodyIndex, bool bFromSweep, const FHitResult& SweepResult)
{
    UE_LOG(LogTemp, Display, TEXT("닿음?"));
    if (Item == nullptr)
    {
        Destroy();
        return;
    }

    ICharacterItemInterface* Character = Cast<ICharacterItemInterface>(OtherActor);
    if (Character)
    {
        Character->TakeItem(Item);
    }

    Destroy();
}
생성자는 박스의 생김새와 관련된 코드이며, 취향껏 조정할 수 있다.
생성자에서 OnComponentBeginOverlap 키워드를 볼 수 있는데, 이는 PrimitiveComponent에 선언된 델리게이트이다.
DECLARE_DYNAMIC_MULTICAST_SPARSE_DELEGATE_SixParams
( FComponentBeginOverlapSignature, UPrimitiveComponent,
OnComponentBeginOverlap, UPrimitiveComponent*, OverlappedComponent,
AActor*, OtherActor, UPrimitiveComponent*, OtherComp,
int32, OtherBodyIndex, bool, bFromSweep, const FHitResult &, SweepResult);
BoxComponent는 이를 상속받고 있기 때문에 BoxComponent로 접근할 수 있다. 이를 이용해 박스 컴포넌트에 물체가 들어왔을 때 감지할 수 있다. 델리게이트 규칙에 맞춰 OnOverlapBegin이라는 함수를 정의해서 AddDynamic을 통해 바인딩 시켜주면 캐릭터가 해당 구역에 들어왔는지 감지할 수 있다.
아이템을 얻을 수 있는 구역은 하나의 캐릭터가 아닌 다양한 캐릭터들이 들어올 수 있기 때문에 특정 캐릭터의 헤더파일을 인클루드 하는 것이 아닌 인터페이스를 통해 접근하도록 한다. 그러면 아이템 박스와 캐릭터간 의존성을 줄일 수 있으며 확장이 필요한 경우 쉽게 확장할 수 있다.
인터페이스 코드는 다음과 같다.
class PRACTICE_API ICharacterItemInterface
{
	GENERATED_BODY()

	// Add interface functions to this class. This is the class that will be inherited to implement this interface.
public:
	virtual void TakeItem(class UItemData* ItemData) = 0;
};
아이템은 종류가 여러가지일 수 있으니, 별도로 PrimaryDataAsset 클래스를 사용해서 관리할 수 있다. 여기서는 한가지 아이템 종류가 있다고 가정한다.
UCLASS()
class PRACTICE_API UItemData : public UPrimaryDataAsset
{
	GENERATED_BODY()

public:
	UPROPERTY(EditAnywhere, Category = "Item")
	TObjectPtr<class USkeletalMesh> Item;
};
이 클래스를 기반으로 DataAsset 블루프린트를 만들어준 뒤
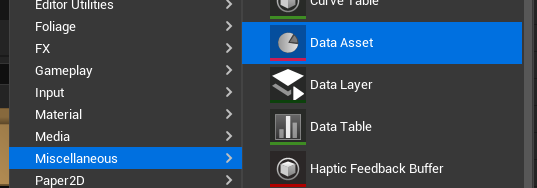
캐릭터가 가지게 할 아이템 메시를 선택해준다.

이제 마지막으로 캐릭터 클래스로 돌아가 인터페이스를 구현한 뒤 아이템을 캐릭터의 스켈레탈 메시 소켓에 끼우면 끝이다! 여기선 ThirdPerson 템플릿의 캐릭터를 사용했다.
//인터페이스 헤더 추가 및 상속
#include "CharacterItemInterface.h"
class APracticeCharacter : public ACharacter, public ICharacterItemInterface

//아이템 메시와 인터페이스 구현 함수
public:
	UPROPERTY(VisibleAnywhere, BlueprintReadOnly, Category = "Item")
	TObjectPtr<class USkeletalMeshComponent> Item;

	virtual void TakeItem(class UItemData* ItemData) override;
생성자에서 Item에 컴포넌트를 만들어준 뒤 스켈레탈 메시 소켓을 찾아 끼워주면 된다.
//캐릭터의 생성자 코드
Item = CreateDefaultSubobject<USkeletalMeshComponent>(TEXT("Item"));
Item->SetupAttachment(GetMesh(), TEXT("hand_rSocket"));
Item의 스켈레탈 메시는 인터페이스에 있는 함수를 구현함으로써 초기화 세팅해줄 수 있다.
void APracticeCharacter::TakeItem(UItemData* ItemData)
{
	Item->SetSkeletalMesh(ItemData->Item);
}
ItemBox를 월드에 배치한 뒤 아까 만들어뒀던 DataAsset을 넣어주면 캐릭터가 이제 아이템을 획득할 수 있다!

'Unreal Engine5' 카테고리의 다른 글
| [UE5] 적 AI 공격 구현하기 (0) | 2024.07.29 |
|---|---|
| [UE5] AI 적 조종하기 (0) | 2024.07.29 |
| [UE5] Enhanced Input을 활용한 이동 (1) | 2024.07.01 |
| [UE5] 캐릭터 회전 설정값 (0) | 2024.07.01 |
| [UE5] 물체 잡기 (0) | 2024.06.29 |


