
| 일 | 월 | 화 | 수 | 목 | 금 | 토 |
|---|---|---|---|---|---|---|
| 1 | 2 | 3 | ||||
| 4 | 5 | 6 | 7 | 8 | 9 | 10 |
| 11 | 12 | 13 | 14 | 15 | 16 | 17 |
| 18 | 19 | 20 | 21 | 22 | 23 | 24 |
| 25 | 26 | 27 | 28 | 29 | 30 | 31 |
Tags
- 게임 개발
- 디자인패턴
- 언리얼엔진
- 소멸자
- 프로그래밍
- 자료구조
- 언리얼
- Unreal Engine
- 언리얼 엔진5
- UE5
- 포인터
- 언리얼엔진5
- C언어
- AI
- 언리얼5
- effectivec++
- CPP
- 생성자
- Unreal Engine5
- 복사생성자
- cpp개발
- 게임프로그래밍패턴
- C++
- 배열
- 프로세스
- 게임개발
- Unreal
- BehaviorTree
- 데이터구조
- 복사대입연산자
Archives
- Today
- Total
리얼 개발
[UE5] Enhanced Input을 활용한 이동 본문
먼저 Enhanced Input 플러그인과 프로젝트 설정에 Enhanced Input이 설정되어 있어야 한다.

마지막으로 Build.cs 소스 파일에 EnhancedInput 모듈을 추가해주면 준비가 끝난다.

Input Action과 Input Mapping Context 데이터 애셋 추가
사용자 입력을 받을 Input Action 데이터 애셋과 Input Action을 연결해줄 Input Mapping Context를 추가한다.
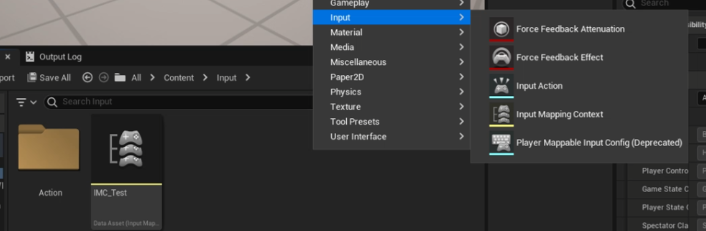
컨텐츠 브라우저 창에서 우클릭으로 추가할 수 있다. 생성한 애셋들을 C++와 연결해야 한다.
C++로 움직임 구현
//캐릭터 클래스의 헤더파일
#include "InputActionValue.h" //해당 헤더파일 필요

public:
	UPROPERTY(EditAnywhere, BlueprintReadWrite, Category = "Input")
	TObjectPtr<class UInputMappingContext> InputMappingContext;

	UPROPERTY(EditAnywhere, BlueprintReadWrite, Category = "Input")
	TObjectPtr<class UInputAction> MoveAction;

	UPROPERTY(EditAnywhere, BlueprintReadWrite, Category = "Input")
	TObjectPtr<class UInputAction> LookAction;

	UPROPERTY(EditAnywhere, BlueprintReadWrite, Category = "Input")
	TObjectPtr<class UInputAction> JumpAction;

	void Move(const FInputActionValue& Value);
	void Look(const FInputActionValue& Value);
//캐릭터 클래스의 cpp
#include "InputMappingContext.h" //해당 헤더파일 필요

static ConstructorHelpers::FObjectFinder<UInputMappingContext> InputMappingRef(TEXT("/Script/EnhancedInput.InputMappingContext'/Game/Input/IMC_Test.IMC_Test'"));
if (InputMappingRef.Object)
{
	InputMappingContext = InputMappingRef.Object;
}

static ConstructorHelpers::FObjectFinder<UInputAction> MoveActionRef(TEXT("/Script/EnhancedInput.InputAction'/Game/Input/Action/IA_Move.IA_Move'"));
if (MoveActionRef.Object)
{
	MoveAction = MoveActionRef.Object;
}

static ConstructorHelpers::FObjectFinder<UInputAction> LookActionRef(TEXT("/Script/EnhancedInput.InputAction'/Game/Input/Action/IA_Look.IA_Look'"));
if (LookActionRef.Object)
{
	LookAction = LookActionRef.Object;
}

static ConstructorHelpers::FObjectFinder<UInputAction> JumpActionRef(TEXT("/Script/EnhancedInput.InputAction'/Game/Input/Action/IA_Jump.IA_Jump'"));
if (JumpActionRef.Object)
{
	JumpAction = JumpActionRef.Object;
}
ConstructorHelpers를 이용해 헤더 파일을 직접 include 하지 않아 의존성 및 컴파일 시간을 줄일 수 있다.
이제 Input Mapping Context를 등록해주고 입력 키에 대한 로직 작성 후 바인딩 시켜주면 끝이 난다.
//캐릭터 클래스의 cpp
#include "EnhancedInputComponent.h" //해당 헤더파일 필요
#include "EnhancedInputSubsystems.h" //해당 헤더파일 필요

void AACharacter::BeginPlay()
{
	Super::BeginPlay();
	//Input Mapping Context 등록
	APlayerController* PlayerController = CastChecked<APlayerController>(GetController());
	if (UEnhancedInputLocalPlayerSubsystem* Subsystem = ULocalPlayer::GetSubsystem<UEnhancedInputLocalPlayerSubsystem>(PlayerController->GetLocalPlayer()))
	{
		Subsystem->AddMappingContext(InputMappingContext, 0);
	}
}

void AACharacter::SetupPlayerInputComponent(UInputComponent* PlayerInputComponent)
{
	Super::SetupPlayerInputComponent(PlayerInputComponent);

	UEnhancedInputComponent* EnhancedInputComponent = CastChecked<UEnhancedInputComponent>(PlayerInputComponent);
	//함수 바인딩
	EnhancedInputComponent->BindAction(JumpAction, ETriggerEvent::Triggered, this, &ACharacter::Jump);
	EnhancedInputComponent->BindAction(JumpAction, ETriggerEvent::Completed, this, &ACharacter::StopJumping);
	EnhancedInputComponent->BindAction(MoveAction, ETriggerEvent::Triggered, this, &AACharacter::Move);
	EnhancedInputComponent->BindAction(LookAction, ETriggerEvent::Triggered, this, &AACharacter::Look);

}

//로직 작성
void AACharacter::Move(const FInputActionValue& Value)
{
	FVector2D MovementVector = Value.Get<FVector2D>();

	const FRotator Rotation = Controller->GetControlRotation();
	const FRotator YawRotation(0, Rotation.Yaw, 0);

	const FVector ForwardDirection = FRotationMatrix(YawRotation).GetUnitAxis(EAxis::X);
	const FVector RightDirection = FRotationMatrix(YawRotation).GetUnitAxis(EAxis::Y);

	AddMovementInput(ForwardDirection, MovementVector.X);
	AddMovementInput(RightDirection, MovementVector.Y);
}

void AACharacter::Look(const FInputActionValue& Value)
{
	FVector2D LookAxisVector = Value.Get<FVector2D>();

	AddControllerYawInput(LookAxisVector.X);
	AddControllerPitchInput(-LookAxisVector.Y);
}
마지막으로 IA_Move InputAction은 Value Type이 Vector2D로 설정되어 있다. 기본적으로 어떤 입력이던 (1, 0)을 반환한다. 따라서 Modifiers 값을 설정해 방향을 결정해줘야 한다.
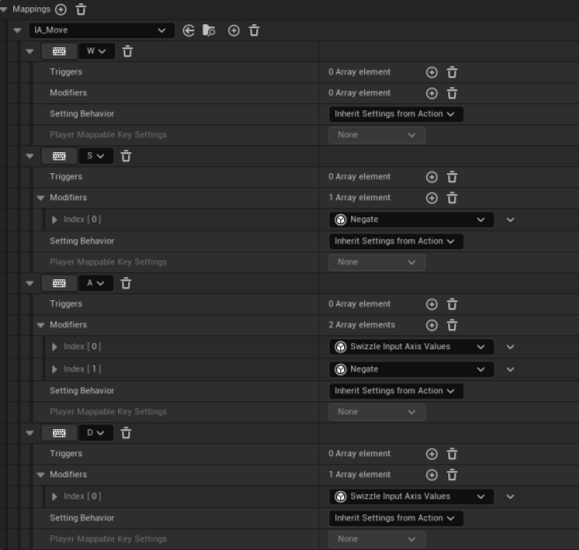
- Swizzle Input Axis Values : x, y 값을 서로 바꾼다.
- Negate : x, y 값에 -1을 곱한다.
위 설정을 모두 마친다면 기본적인 캐릭터 움직임을 구현할 수 있다. 아래 공식문서를 통해 향상된 입력에 대한 자세한 원리를 알 수 있을 것이다.
'Unreal Engine5' 카테고리의 다른 글
| [UE5] 적 AI 공격 구현하기 (0) | 2024.07.29 |
|---|---|
| [UE5] AI 적 조종하기 (0) | 2024.07.29 |
| [UE5] 아이템 획득하기 (0) | 2024.07.11 |
| [UE5] 캐릭터 회전 설정값 (0) | 2024.07.01 |
| [UE5] 물체 잡기 (0) | 2024.06.29 |
'Unreal Engine5' Related Articles
more


