| 일 | 월 | 화 | 수 | 목 | 금 | 토 |
|---|---|---|---|---|---|---|
| 1 | 2 | 3 | 4 | 5 | 6 | |
| 7 | 8 | 9 | 10 | 11 | 12 | 13 |
| 14 | 15 | 16 | 17 | 18 | 19 | 20 |
| 21 | 22 | 23 | 24 | 25 | 26 | 27 |
| 28 | 29 | 30 | 31 |
- AI
- 자료구조
- 언리얼엔진
- BehaviorTree
- 언리얼 엔진5
- Vector
- C언어
- 게임개발
- cpp개발
- 배열
- 디자인패턴
- 프로그래밍
- Unreal Engine
- 게임 개발
- C++
- 복사생성자
- 복사대입연산자
- 게임프로그래밍패턴
- 데이터구조
- 스마트포인터
- 언리얼엔진5
- UE5
- 언리얼
- CPP
- Unreal
- 언리얼5
- Unreal Engine5
- 프로세스
- effectivec++
- 포인터
- Today
- Total
리얼 개발
[UE5] 물체 잡기 본문
라인 트레이스를 통해 언리얼 엔진에서 물체 잡기를 구현해보는 연습이다.
Line Trace
게임 세계에서 두 지점 사이에 어떤 물체가 있는지 확인할 수 있는 한가지 방법이다. 라인 트레이스는 특정 물체를 감지할 수 있는데 그것을 "트레이스 채널" 을 통해 감지할 수 있다. 필터와 같이 걸러내고 싶은 물체를 걸러낸다고 생각하면 된다.
- Visibility
보이는 물체를 확인하기 위해 라인트레이스를 사용할 경우 Visibility 트레이스 채널을 사용하면된다.
플레이어 이동을 막기위한 투명벽 같은 경우에는 Visibility 트레이스와 충돌하지 않음.
- Pawn
게임 세계를 이동할 수 있는 폰을 확인하기 위해 라인트레이스를 시행하는 경우 Pawn 트레이스 채널과 충돌한다.
Visiblility, Pawn과 같이 에디터에서 기본적으로 제공하는 트레이스들이 있다.
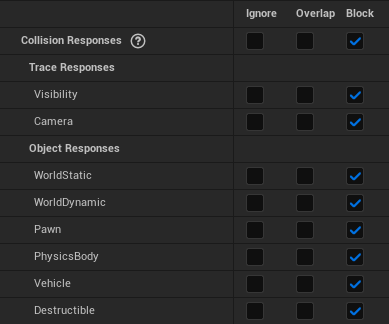
또 한가지 눈 여겨 봐야될 것은 오른쪽 상단의 Block, Overlap, Ignore이다. 이것들은 라인 트레이스가 해당 물체에 어떻게 반응해야하는 지를 결정한다.
Block : 트레이스가 뻗혀나가지 않고 해당 오브젝트에 막힘
Ignore : 트레이스가 해당 오브젝트를 무시하고 계속 뻗혀나감
Overlap은 트레이스가 아닌 물체 상태에 관여한다. Overlap으로 설정된 두 개의 물체를 겹칠 수 있다. 아래는 충돌 설정에 따른 결과표이다.

UPhysicsHandle Component
캐릭터가 임의의 오브젝트를 잡을 때 혹은 소유하고자 할 때 사용할 수 있다. 이 컴포넌트는 물체에 붙이는 것이 아닌 캐릭터에 붙여 컴포넌트가 다른 물체를 잡고있다고 생각하면 될 것 같다.
USceneComponent
Transform 정보를 가지고 있으며 캐릭터에 부착할 수 있다. 하지만 일반 액터처럼 Mesh를 덮어 화면 상에 배치할 수 없다.
물체 잡기
클래스를 만들기 전에 우리가 어떤 라인 트레이스 채널을 사용해 물체와 상호작용할지 에디터에 알려줘야 한다. 우리는 새로운 라인 트레이스 채널을 만들어 그 채널에 맞는 액터만 잡을 것이다.

프로젝트 세팅에 들어가 Collision 탭을 클릭해보면 해당 창이 나올 것이다. New Line Trace 버튼을 클릭하고 Ignore 설정을 선택 후 새로운 트레이스 채널을 만들어주자.
이러면 에디터에 새로운 채널이 등록되는데 파일 탐색기로 해당 프로젝트 경로로 들어가 Config -> DefaultEngine 파일을 열어보자. Ctrl + F5키를 눌러 Grab을 검색해보면 우리가 만든 트레이스 채널이 보일 것이다.

"ECC_GameTraceChannel1"을 복사해서 가져와주자. 나중에 Line Trace 함수를 만들 때 인자값으로 넘겨주어야 한다.
USceneComponent 를 상속받은 클래스 이름을 Grabber로 만들었다.
//Grabber 클래스의 헤더파일
#pragma once

#include "CoreMinimal.h"
#include "Components/SceneComponent.h"
#include "Grabber.generated.h"


UCLASS( ClassGroup=(Custom), meta=(BlueprintSpawnableComponent) )
class PLAYHAEDREAM_API UGrabber : public USceneComponent
{
	GENERATED_BODY()

public:
	// Sets default values for this component's properties
	UGrabber();

protected:
	// Called when the game starts
	virtual void BeginPlay() override;

public:
	// Called every frame
	virtual void TickComponent(float DeltaTime, ELevelTick TickType, FActorComponentTickFunction* ThisTickFunction) override;

	UFUNCTION(BlueprintCallable)
	void Grab();

	UFUNCTION(BlueprintCallable)
	void Release();

private:
	UPROPERTY(EditAnywhere, Category = "Distance")
	float MaxGrabDistance = 400.0f;

	UPROPERTY(EditAnywhere, Category = "Distance")
	float HoldDistance = 300.0f;

	UPROPERTY(EditAnywhere)
	float Radius = 15.0f;

    //UPhysicsHandleComponent 사용하기 위한 전방 선언
	UPROPERTY(VisibleAnywhere)
	class UPhysicsHandleComponent* PhysicsHandle;

    //캐릭터에 붙어있는 카메라로 부터 라인 트레이스를 쏠 것 이다.
	UPROPERTY(VisibleAnywhere)
	class UCameraComponent* GrabberCamera;

private:
	UFUNCTION()
	bool GetGrabInReach(FHitResult& OutHitResult);

};
//Grabber 클래스 Cpp 파일

#include "Grabber.h"
#include "PhysicsEngine/PhysicsHandleComponent.h" //UPhysicsHandleComponent의 헤더파일
#include "Camera/CameraComponent.h" //UCameraComponent의 헤더파일

// Sets default values for this component's properties
UGrabber::UGrabber()
{
	// Set this component to be initialized when the game starts, and to be ticked every frame.  You can turn these features
	// off to improve performance if you don't need them.
	PrimaryComponentTick.bCanEverTick = true;

	// ...
}


// Called when the game starts
void UGrabber::BeginPlay()
{
	Super::BeginPlay();

	PhysicsHandle = GetOwner()->FindComponentByClass<UPhysicsHandleComponent>();
	GrabberCamera = GetOwner()->FindComponentByClass<UCameraComponent>();

	if (!PhysicsHandle || GrabberCamera)
	{
		UE_LOG(LogTemp, Error, TEXT("피직스 핸들러, 카메라 포인터 못찾음!"));
		return;
	}
}


// Called every frame
void UGrabber::TickComponent(float DeltaTime, ELevelTick TickType, FActorComponentTickFunction* ThisTickFunction)
{
	Super::TickComponent(DeltaTime, TickType, ThisTickFunction);

	if (PhysicsHandle->GetGrabbedComponent())
	{
		FVector TargetLocation = GrabberCamera->GetComponentLocation() + GrabberCamera->GetForwardVector() * HoldDistance;
		PhysicsHandle->SetTargetLocationAndRotation(TargetLocation, GetComponentRotation());
	}
}

void UGrabber::Grab()
{
	FHitResult HitResult;
	if (GetGrabInReach(HitResult))
	{
		UPrimitiveComponent* HitComponent = HitResult.GetComponent();
		if (HitComponent)
		{
			HitComponent->WakeAllRigidBodies();
			PhysicsHandle->GrabComponentAtLocationWithRotation(
				HitComponent,
				NAME_None,
				HitResult.ImpactPoint,
				GetComponentRotation()
			);
		}
	}
}

void UGrabber::Release()
{
	if (PhysicsHandle->GetGrabbedComponent())
	{
		PhysicsHandle->GetGrabbedComponent()->WakeAllRigidBodies();
		PhysicsHandle->ReleaseComponent();
	}
}

bool UGrabber::GetGrabInReach(FHitResult& OutHitResult)
{
	FVector Start = GrabberCamera->GetComponentLocation();
	FVector End = Start + GrabberCamera->GetForwardVector() * MaxGrabDistance;

	FCollisionShape Shpere = FCollisionShape::MakeSphere(Radius);

	return GetWorld()->SweepSingleByChannel(
		OutHitResult,
		Start, End,
		FQuat::Identity,
		ECC_GameTraceChannel1,
		Shpere
	);
}
해당 코드를 입력했다면 에디터를 끄고 컴파일러에서 빌드를 해준다. 마지막으로 캐릭터 블루프린터에 들어가 몇가지 설정을 해주면 끝이 난다.

캐릭터 블루프린트에 해당 컴포넌트들을 붙여준다.
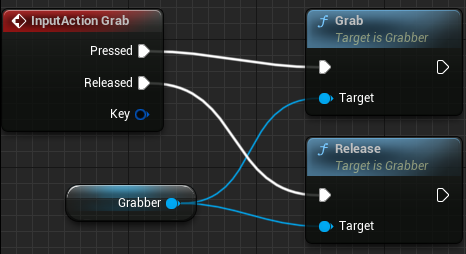
프로젝트 세팅 -> Input에서 Action mapping 을 추가하고 이름을 Grab으로 설정한다. 그 후 캐릭터 블루프린트로 돌아와 Event Graph에서 우클릭 후 Grab을 검색하면 빨간색의 Input Action Grab이 뜰 것이다. 추가 후 우리가 UGrabber에서 정의한 Grab 함수와 Release 함수를 연결해주면 끝이 난다.
'Unreal Engine5' 카테고리의 다른 글
| [UE5] 적 AI 공격 구현하기 (0) | 2024.07.29 |
|---|---|
| [UE5] AI 적 조종하기 (0) | 2024.07.29 |
| [UE5] 아이템 획득하기 (1) | 2024.07.11 |
| [UE5] Enhanced Input을 활용한 이동 (3) | 2024.07.01 |
| [UE5] 캐릭터 회전 설정값 (0) | 2024.07.01 |


